Pygame
Grey overlay
Pink
Green
Blue
Cream
Liliac
Purple
Yellow
Objectives
Developing Programming and Development (learning strand), specifically:
- Understand and use Sprites, images and sound files for our game objects.
- Understand and use variables to change to keep track of the X and Y coordinates of a sprite/image.
- Understand the process of painting the screen with image(s) known as Bit Blitting or Blit.
- Understand that Event Handlers can be used to perform an action detected by an Event Listener.
- Understand and use of outputting text to the screen.
- Understand and use selection, i.e. using if-else, if-elif, to branch the flow of an action.
Stage fright
Save It
- Download and save the Stages Template. Please note this is a different template to all previous lessons.
- You'll also need some assets for your game:
- Download this sound file and save it to your Images folder.
- Download this background image and save it to your Images folder.
- Download this sprite file and alo save it to your Images folder.
Learn It
- In order for your game to look like a real game we’ll need to have several states for it to exist in.
- The game will have 3 states - splash, playing and game over.
- Splash:
- Opening image
- Title
- Instructions
- Reset game specific variables e.g. score
- Capture start time – for the timer
- Playing:
- The actual game we’ve been creating
- Game Over:
- Displays players results e.g. score / average distance from target
- Option to restart game
Build It - Setup
- Before the game loop begins we need to setup the font, images and sounds.
- This is done before the game loop as it only needs to be done once.
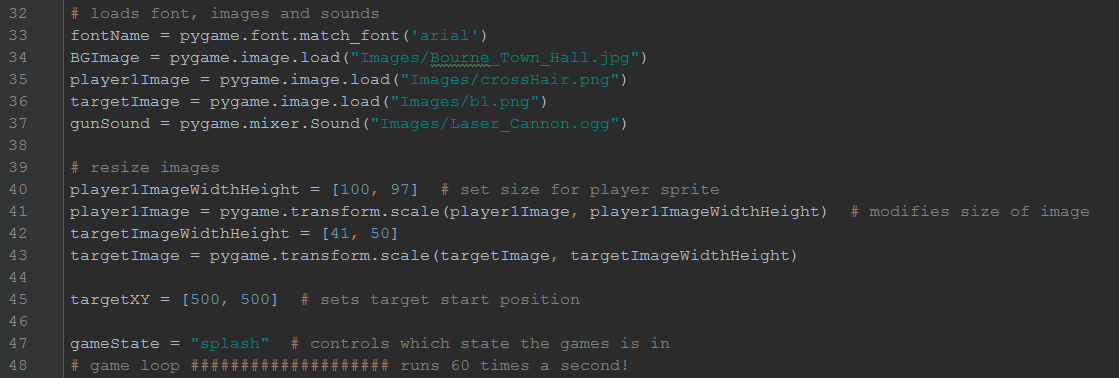
- You may need to change the file names for your player, target and background images.
# loads font, images and sounds
fontName = pygame.font.match_font('arial')
BGImage = pygame.image.load("Images/Bourne_Town_Hall.jpg")
player1Image = pygame.image.load("Images/crossHair.png")
targetImage = pygame.image.load("Images/b1.png")
gunSound = pygame.mixer.Sound("Images/Laser_Cannon.ogg")

# resize images
player1ImageWidthHeight = [100, 97]  # set size for player sprite
player1Image = pygame.transform.scale(player1Image, player1ImageWidthHeight)  # modifies size of image
targetImageWidthHeight = [41, 50]
targetImage = pygame.transform.scale(targetImage, targetImageWidthHeight)

targetXY = [500, 500]  # sets target start position
Build It - Splash
- Next we will add the game specific variables to the splash stage so they can be reset at the beginning of each new game.
- The state change to the playing state is triggered by the left mouse click.

# set start game variables
startTime = pygame.time.get_ticks()
fireLock = 0
score = 0
hitList = []
distanceList = []
- The hitList is used to score the X and Y coordinates of each successful hit on the target.
- The distanceList is used to store the distance from the centre of the target for each successful hit.
- Both of these are used in the game over state to inform the user of their performance.
Build It - Playing
- The playing state contains the game code we have written.
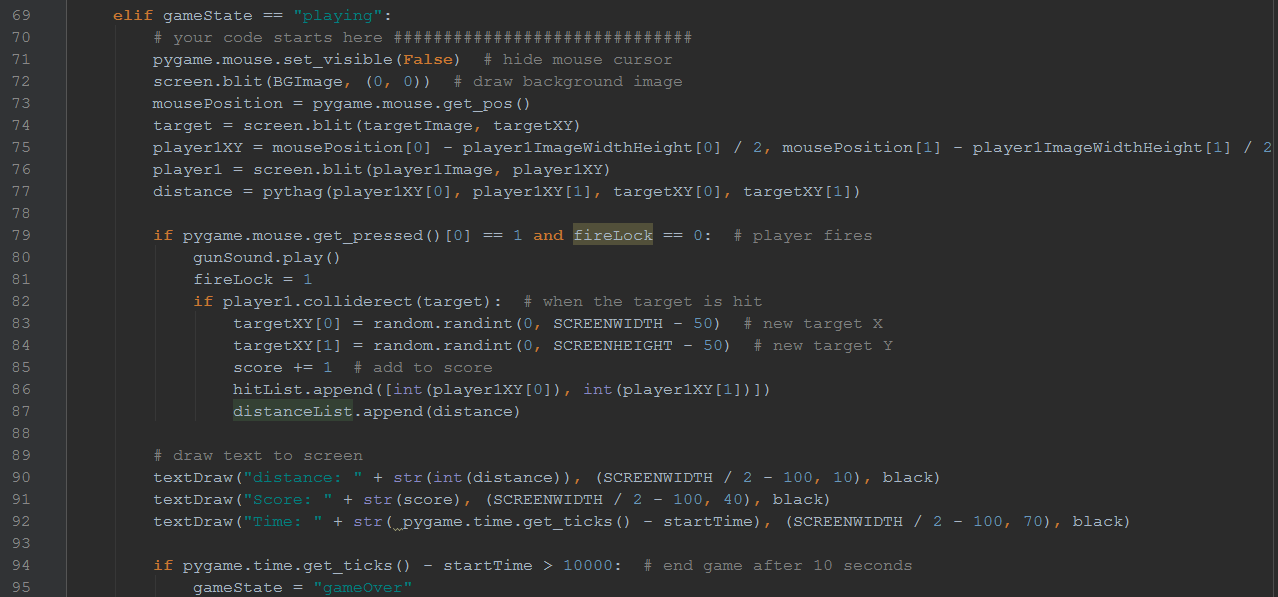
pygame.mouse.set_visible(False)  # hide mouse cursor
    screen.blit(BGImage, (0, 0))  # draw background image
    mousePosition = pygame.mouse.get_pos()
    target = screen.blit(targetImage, targetXY)
    player1XY = mousePosition[0] - player1ImageWidthHeight[0] / 2, mousePosition[1] - player1ImageWidthHeight[1] / 2
    player1 = screen.blit(player1Image, player1XY)
    distance = pythag(player1XY[0], player1XY[1], targetXY[0], targetXY[1])

    if pygame.mouse.get_pressed()[0] == 1 and fireLock == 0:  # player fires
        gunSound.play()
        fireLock = 1
        if player1.colliderect(target):  # when the target is hit
        targetXY[0] = random.randint(0, SCREENWIDTH - 50)  # new target X
        targetXY[1] = random.randint(0, SCREENHEIGHT - 50)  # new target Y
        score += 1  # add to score
        hitList.append([int(player1XY[0]), int(player1XY[1])])
        distanceList.append(distance)

    # draw text to screen
    textDraw("distance: " + str(int(distance)), (SCREENWIDTH / 2 - 100, 10), black)
    textDraw("Score: " + str(score), (SCREENWIDTH / 2 - 100, 40), black)
    textDraw("Time: " + str( pygame.time.get_ticks() - startTime), (SCREENWIDTH / 2 - 100, 70), black)

    if pygame.time.get_ticks() - startTime > 10000:  # end game after 10 seconds
        gameState = "gameOver"
- The state change to the game over state is triggered by a timer.
Build It - Game Over
- The game over state displays the players score, average distance of each hit. The location of each hit and its distance are drawn to the screen.
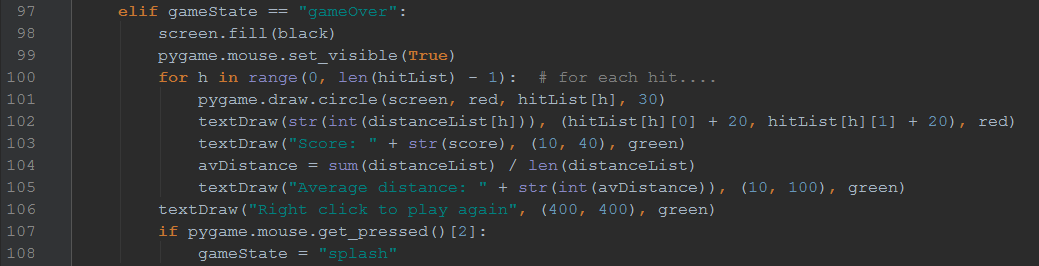
screen.fill(black)
pygame.mouse.set_visible(True)
for h in range(0, len(hitList) - 1):  # for each hit....
    pygame.draw.circle(screen, red, hitList[h], 30)
    textDraw(str(int(distanceList[h])), (hitList[h][0] + 20, hitList[h][1] + 20), red)
    textDraw("Score: " + str(score), (10, 40), green)
    avDistance = sum(distanceList) / len(distanceList)
    textDraw("Average distance: " + str(int(avDistance)), (10, 100), green)
textDraw("Right click to play again", (400, 400), green)
if pygame.mouse.get_pressed()[2]:
    gameState = "splash"
- The state change back the splash stage is triggered by a right mouse click.
Test It
- Try running your program.
- If it doesn't work, some possible explanations are:
- Images or sound files in the wrong location or the files names do not match.
- Levels of indentation are incorrect.
- The video tutorial below walks you through building the finished game:
Badge It
- Silver: The code uses something called a list to store the players moves. Read the first half of these online notes about lists, then write a short piece in a text file (e.g. using Notepad) to explain what a list is.
- Gold: Add a background image and some additional text to the splash screen section of the code, and upload a screenshot of the new splash screen to collect the badge.
- Platinum: Modify the game to use your own sprites, backgrounds and sounds, by looking around online. Upload screenshots of your revised game, and the .py file and your new assets to collect the badge.