Getting to know you
<div id="underlay" onclick="underlayoff()"> </div>
<div id="stickyribbon"> <ul> <li><a href="step1.html">Week1</a></li> <li><a href="step2.html">Week2</a></li> <li><a href="3Lesson.html">Week3</a></li> <li><a href="4Lesson.html">Week4</a></li> <li><a href="5Lesson.html">Week5</a></li> <li><a href="6Lesson.html">Week6</a></> <li><a href="evaluation.html">Evaluation</a></li>
</ul> </div>
<div id="overlay" onclick="overlayoff()"> </div> <div id=overlayMenu> <p onclick="overlayon('hsla(0, 0%, 50%, 0.5)')">Grey overlay</p> <p onclick="underlayon('hsla(300,100%,50%, 0.3)')">Pink</p> <p onclick="underlayon('hsla(80, 90%, 40%, 0.4)')">Green</p> <p onclick="underlayon('hsla(240,100%,50%,0.2)')">Blue</p> <p onclick="underlayon('hsla(40,100%,50%,0.3)')">Cream</p> <p onclick="underlayon('hsla(300,100%,40%,0.3)')">Liliac</p> <p onclick="underlayon('hsla(300,100%,25%,0.3)')">Purple</p> <p onclick="underlayon('hsla(60,100%,50%,0.3)')">Yellow</p> </div> <div class=ribbon> <a href="https://github.com/stsb11/turtle">Fork me on GitHub</a> </div> <center> <img src='img/turtle.jpg' width=33%> </center>
Introduction
Python Turtle
- Python is a highly popular programming language, used by many large organisations.
- Facebook, NASA, IBM, Google and Yahoo among others all use it extensively.
- It is considered by many to be one of the easiest languages to pick up.
- One of the big attractions of Python is that many 'libraries' are available to provide it with extra functionality.
- A library is a set of extra functions that help perform different types of task. There are libraries for advanced maths, graph drawing, graphics, game writing, random numbers and so forth.
- We're going to use a fun library called 'Turtle', which allows for the convenient drawing of lines and shapes.
Let's get started
- Load up the Python Development, called IDLE.
- You'll be presented with the Python Shell window, which looks like this…
- With the mouse in the shell window, type the following at the >>> Prompt.
- Hit enter after each line.
- (Note: Make sure you write Screen with a capital letter!
import turtle
wn=turtle.Screen()
wn.bgcolor("lightgreen")
wn.title("Turtle Power")
- A graphics window (currently empty) will appear that we can draw into.
- We've called our screen object, "wn". Every time we want Python to control somthing to do with this window, we'll need to put wn. in front of the command.
- We also changed the background colour, and put a title on the window.
- Let's add a "turtle" to the screen. We can move this arounnd the screen to draw shapes and patterns. We'll call our turtle, "Tess".
tess=turtle.Turtle()
tess.color("hotpink")
tess.pensize(5)
tess.shape("turtle")
- When we created a tess object, we then went on to set some of her properties - colour, thickness of the lines she'll draw and how she appears on the screen.
- Incidentally, a full colour list can be found here.
- We could add other turtle objects too, if we wanted, and have several drawing shapes on the screen. We might have a look at that later on.
- Next, lets start to draw. Type…
tess.forward(100)
tess.left(90)
tess.forward(100)
tess.left(90)
tess.forward(100)
tess.left(90)
tess.forward(100)
tess.left(90)
- Your turtle should have traced a square shape for you.
Your turn
Try it
- Tip: You can move the turtle back to the centre, and clear the screen at any time by using the commands…
tess.home()
tess.clear()
- Experiment with drawing lines until you're confident, then try the badge task.
Badge it
- Silver: Draw a red triangle, (screenshot the result, and upload the image file to BourneToLearn)
- Gold: Draw a pentagon, where each side is a different colour,
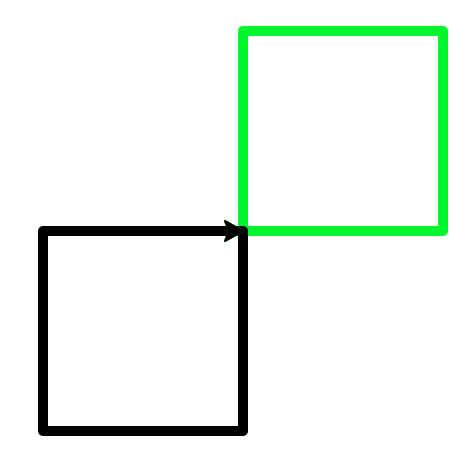
- Platinum: Create second turtle on the screen, and call it tom. Have this draw a black square, and the other turtle draw a green square, so that they look like this…
Write interpreter commands to draw a grid two squares tall and two squares wide (like the Windows logo). Each square should be a different colour.